
If you’re anything like me, you know that creating content is just half the battle. Sure, your videos, blogs, or courses are amazing—but what about how your audience experiences your platform?
Hey there, fellow creator!
That’s where custom menus and branding presets come in. These little power tools make it super easy to design a website or platform that not only feels uniquely yours but also makes life easier for your followers.
I’m going to walk you through how custom menus and branding presets can completely level up your platform, without you needing to be a tech whiz or a design genius. Let’s dive in!
1. Personalizing the User Journey with Custom Menus
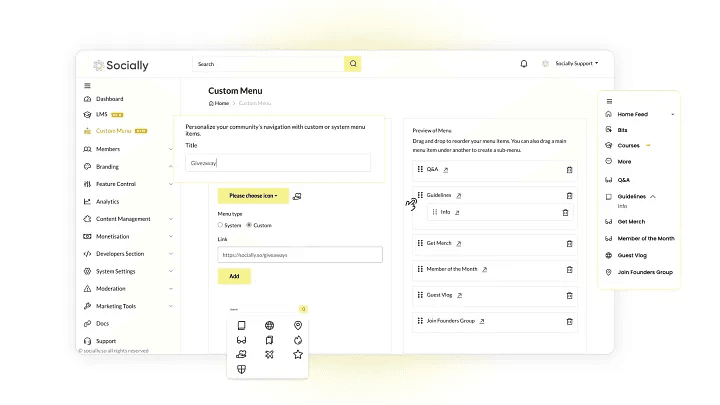
You know how sometimes you visit a website, and it’s all over the place? You have no clue where to click, and the important stuff is buried under layers of clutter? Yeah, we don’t want that for your followers. Custom menus help avoid this by letting you design a clear, intuitive path for them to follow.
Step 1: Think Like Your Audience
The first step to designing a custom menu is getting into the minds of your audience. Think about what they’re coming to you for. Is it your tutorials? Your merch? Maybe you’ve got an awesome community they should be joining?
Here’s an example:
Let’s say you’re a fitness coach. Your menu could have sections like:
Workouts (for your videos or PDFs),
Nutrition Plans (because fitness isn’t just about working out!),
Challenges (you know, to keep your community motivated).
That way, when someone lands on your site, they don’t have to search for what they need. It’s all right there, laid out beautifully for them.
Step 2: Make Important Stuff Pop
Now, menus aren’t just for the basics—you can also use them to highlight what’s new or important. Got a new course? A limited-time offer? A big event coming up? Add it right to your menu where everyone can see it.
For example, if you’re a musician launching an album, why not create a big, bold "New Album" section in your menu that links directly to your store or streaming links? Let your fans find your latest work without any hassle.
Step 3: Mobile is Key!
We can’t forget about mobile users (because let’s be real, most of us are browsing on our phones). Make sure your custom menu looks and works just as well on mobile as it does on desktop. If someone has to pinch and zoom to click on your menu, they’re probably bouncing out.
Take, for example, a travel blogger. If your audience is scrolling through your site on their phones while planning trips, they’ll want quick access to your Destinations section or Travel Tips without a lot of scrolling. Keep it clean and responsive!
2. Strengthening Your Brand with Preset Themes
Now, let’s talk branding. We all know how important it is to have a consistent look. If your content is all over the place—like one day your site’s pink and the next day it’s neon green—your audience might feel a bit disconnected. That’s where branding presets save the day.
Step 1: Pick a Theme That Screams YOU
Branding presets are like the wardrobe for your website. They come with a bunch of ready-made styles you can apply in just a few clicks. But here’s the fun part: You can pick a preset that fits your vibe and adjust it as needed. Think of it as building your personal brand uniform.
For example, if you’re a lifestyle vlogger with a sunny, vibrant personality, you might choose a bright, cheerful color palette and playful fonts. But if you’re a minimalist, maybe a clean, monochrome look is more your speed.
Step 2: Customize to Make it Uniquely Yours
Once you’ve got your theme locked in, you can fine-tune it to match your brand exactly. This is where you can get creative. Adjust the colors to match your brand palette, pick the fonts that reflect your voice, and make sure your logo stands out.
Let’s say you’re an entrepreneur running an online shop. You could go with a sleek, modern theme and then tweak the accent colors to match your logo. Maybe all your buttons are in your signature color, or the font reflects the sophisticated vibe you’re going for. Simple, but powerful!
Step 3: Consistency is Key
You want people to recognize your brand instantly, right? So whatever preset you choose, make sure it’s applied consistently across your entire platform. From your homepage to your blog to your store, everything should feel like it’s part of the same story.
For instance, if you’re a beauty influencer, your branding should flow seamlessly from your YouTube banner to your website. Maybe you’re using soft pastels and elegant typography—just make sure that vibe doesn’t change when someone clicks from your Makeup Tips section to your Shop page.
3. Why Custom Menus + Branding Presets Are the Ultimate Power Duo
Now, here’s where things get really exciting. Custom menus and branding presets aren’t just cool on their own—they work even better together. Here’s why.
Step 1: Keep the Experience Cohesive
When your menu layout matches the look and feel of your branding, it creates this seamless experience for your audience. They know exactly where they are and what to do next, and everything just feels right.
Let’s say you’re a podcast creator. Your custom menu might have sections like Episodes, Merch, and Live Shows, all set against a sleek theme that matches the vibe of your podcast. The consistency between how the site looks and how it functions makes it easy for your listeners to dive deeper into your content.
Step 2: Guide Your Audience Effortlessly
You know what happens when you make things easy? People stick around. The combination of a well-structured menu and an on-brand look is like rolling out the red carpet for your audience. It invites them in, keeps them engaged, and encourages them to explore more of your content.
Think about a course creator who’s offering educational content. A clean, easy-to-navigate menu paired with consistent branding gives your audience a smoother learning experience. No distractions, just clear paths to your best content.
Step 3: Look Professional Without the Headache
Here’s the best part: You don’t need to be a designer to pull this off. With custom menus and branding presets, you’re saving yourself tons of time while still delivering a polished, professional-looking platform. That means you can focus on doing what you love—creating content—while your platform works in the background.
A YouTuber could set up a sleek, cohesive site in a few clicks, making it easy for their audience to find the latest videos, subscribe, or shop for merch, all while looking like they hired a professional designer (but they didn’t!).
Conclusion
At the end of the day, custom menus and branding presets are like the secret sauce for creators. They make your platform look polished and professional, all while giving you the flexibility to make it uniquely yours. With these tools, you can build a cohesive experience that reflects your brand and keeps your audience coming back for more. So, go ahead—play around with your menus, tweak your branding, and see how it transforms your platform into something that truly stands out.
Cheers
Andy From Socially


